Documentation Index
Fetch the complete documentation index at: https://docs.turnkey.com/llms.txt
Use this file to discover all available pages before exploring further.
Prerequisite:
If you haven’t already, check out the External Wallets Overview first, this guide builds on the concepts introduced there.
Setting up wallet authentication
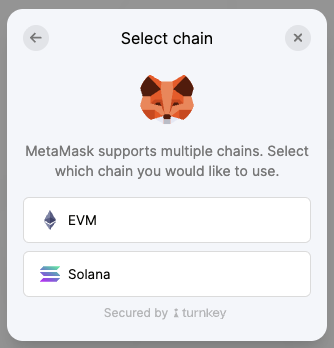
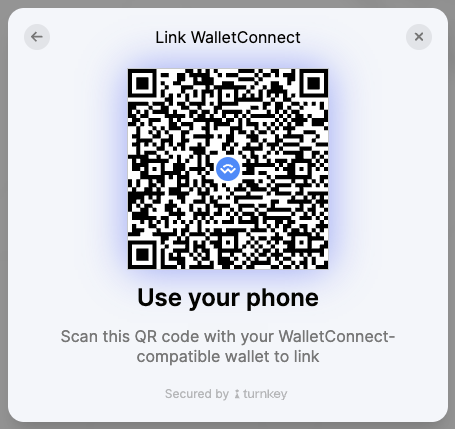
The toggle to enable wallet authentication is available in the TurnkeyProvider configuration. Wallet authentication can also be set in the dashboard, but the TurnkeyProvider configuration takes precedence. You can further customize settings, such as which chains are enabled, which providers are supported, and whether WalletConnect is allowed.
Note:
- For authentication to work, you must define at least one
ethereum or solana chain, either as native or with walletConnectNamespaces.
walletConfig: {
  // at least one chain must be enabled (native: true)
  // or have non-empty `walletConnectNamespaces`
  chains: {
    ethereum: {
      native: false,
      walletConnectNamespaces: ["eip155:1"],
    },
   solana: {
     native: false,
     walletConnectNamespaces: [],
   },
 },
- To enable WalletConnect, you must configure both the
walletConnect object and define walletConnectNamespaces in at least one chain (e.g., ethereum or solana).
import {
  TurnkeyProvider,
  TurnkeyProviderConfig,
} from "@turnkey/react-wallet-kit";
import "@turnkey/react-wallet-kit/styles.css";

function App() {
  const turnkeyConfig: TurnkeyProviderConfig = {
    // ...your existing configuration
    walletConfig: {
      features: {
        // enable external wallet authentication
        auth: true,
      },
      chains: {
        ethereum: {
          // enable native EIP-1193 Ethereum providers (e.g., MetaMask, Phantom)
          native: true,
          // enable WalletConnect for Ethereum mainnet
          walletConnectNamespaces: ["eip155:1"],
        },
        solana: {
          // enable native Solana Wallet Standard providers (e.g., MetaMask, Phantom)
          native: true,
          // enable WalletConnect for Solana mainnet
          walletConnectNamespaces: ["solana:5eykt4UsFv8P8NJdTREpY1vzqKqZKvdp"],
        },
      },
      walletConnect: {
        projectId: "<YOUR_WALLET_CONNECT_PROJECT_ID>",
        appMetadata: {
          name: "<YOUR_APP_NAME>",
          description: "<YOUR_APP_DESCRIPTION>",
          url: "<YOUR_WALLET_CONNECT_PROJECT_URL>",
          icons: ["<YOUR_APP_ICON_URL>"],
        },
      },
    },
  };

  return <TurnkeyProvider config={turnkeyConfig}>{children}</TurnkeyProvider>;
}
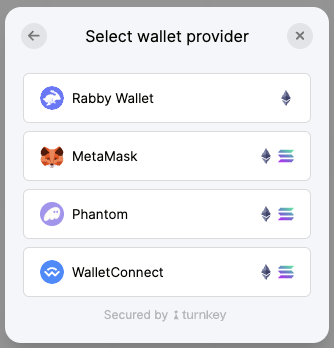
Wallet authentication
There are two paths you can take: let us handle it for you, or build it yourself. We recommend letting us do the heavy lifting using our built-in modal.
Option 1: use the auth modal
If you want a fully styled, plug-and-play experience, use our Auth modal. It handles the entire authentication flow for you.
import { useTurnkey } from "@turnkey/react-wallet-kit";

function LoginButton() {
  const { handleLogin } = useTurnkey();

  return <button onClick={handleLogin}>Login / Sign Up</button>;
}
Note: this UI is customizable. Checkout the UI Customization guide to learn how to customize the look and feel of the Auth modal and other UI components.
Option 2: build a custom auth flow
There are a few ways to authenticate users with their wallets. We provide several abstraction functions that handle authentication, each with slightly different behavior:
loginWithWallet()signUpWithWallet()loginOrSignUpWithWallet()
All three generally follow the same flow, with only minor differences in implementation.
For this guide, we’ll use loginOrSignUpWithWallet() as the reference, since it’s the most commonly used approach.
Get the WalletProvider you want to use
  import { useTurnkey } from "@turnkey/react-wallet-kit";

  const { fetchWalletProviders } = useTurnkey();

  const providers = await fetchWalletProviders();

  // we select the first available provider for simplicity
  // this represents the WalletProvider (e.g., MetaMask) and the currently selected wallet within it
  // this is the wallet that will be used to authenticate into the sub-org
  const selectedProvider = providers[0];
Log in or sign up with that wallet
  import { useTurnkey } from "@turnkey/react-wallet-kit";

  const { loginOrSignUpWithWallet } = useTurnkey();

  const handleLoginOrSignUp = async () => {
    try {
      await loginOrSignupWithWallet({ walletProvider: selectedProvider });
    } catch (error) {
      console.error("Error logging in or signing up:", error);
    }
  };
How does this look structurally in a Turnkey organization?
If you’re just looking to implement wallet authentication in your app, you don’t need to worry about the internal structure. But if you’re curious about how these flows map to Turnkey’s organization model under the hood, here’s a deeper look:
At its core, a wallet is just a key pair. When a user signs up with a wallet, Turnkey creates a sub-org for that user and sets up the public key of the wallet as an authenticator for that sub-org.
From then on, whenever the user wants to log in, they call stampLogin(). This involves signing the login payload with the same wallet key pair.