> ## Documentation Index
> Fetch the complete documentation index at: https://docs.turnkey.com/llms.txt
> Use this file to discover all available pages before exploring further.
# Social logins
> Configure and implement social logins in your React Native app using `@turnkey/react-native-wallet-kit`.
## Configuring OAuth
Using OAuth requires some configuration in the Turnkey Dashboard and your app.
### Enabling OAuth
Navigate to the **Embedded Wallets → Configuration** section in the [Turnkey Dashboard](https://app.turnkey.com/dashboard/walletKit) and enable the
**OAuth**. Note if you have not enabled the Auth Proxy, you will need to do so first. Check out the [Getting Started](/solutions/embedded-wallets/integration-guide/react-native/getting-started) guide for more details.
#### Client IDs
You can choose to enter your primary client IDs for each OAuth provider in the dashboard
Or provide client IDs through your app configuration and pass them into the `TurnkeyProvider`'s config.
Client IDs typically come from the OAuth provider's developer console. For example, Google client IDs can be found in the [Google developer console](https://console.developers.google.com/).
For OAuth2.0 providers, you will need to upload the client ID and secret in
the dashboard. Check out the [OAuth2.0 providers](/solutions/embedded-wallets/integration-guide/react-native/authentication/social-logins#oauth2-0-providers) section for more details.
#### Client configuration
If you prefer configuring via code, provide your client IDs through `TurnkeyProvider`'s config, and set an `appScheme` to complete deep links.
Each provider takes a `primaryClientId` and an optional `secondaryClientIds` array. Any `secondaryClientIds` you pass are registered as additional OIDC audiences on the sub-organization at creation time, which lets a single Turnkey user be authenticated by multiple client IDs (typically used by apps that have both web and mobile versions sharing one identity). You can learn more about Multi-platform OAuth Identities [here](/features/authentication/social-logins#multi-platform-oauth-identities).
Apple Sign-In on iOS uses the **native** Apple Sign-In flow, which authenticates against the iOS app's bundle identifier. On Android, Apple Sign-In uses a **web-based** OAuth flow that authenticates against the Apple **Services ID**. To keep iOS and Android signups for the same user compatible, when you set `iosBundleId`, it is automatically added as a secondary client ID on the sub-org during Android signups (and vice-versa), so a user who signs up on one platform can still sign in on the other.
```ts constants/turnkey.ts theme={"system"}
import type { TurnkeyProviderConfig } from "@turnkey/react-native-wallet-kit";
export const TURNKEY_CONFIG: TurnkeyProviderConfig = {
organizationId: process.env.EXPO_PUBLIC_ORGANIZATION_ID!,
authProxyConfigId: process.env.EXPO_PUBLIC_AUTH_PROXY_CONFIG_ID!,
auth: {
oauth: {
appScheme: "myapp", // Required for RN deep link completion
redirectUri: process.env.EXPO_PUBLIC_OAUTH_REDIRECT_URI, // Optional if you want to force the redirect URI instead of the default `https://oauth-redirect.turnkey.com/?scheme=YOURAPPSCHEME/`
// You will typically get these from the OAuth provider's dashboard. Eg: Google developer console.
google: {
primaryClientId: {
webClientId: process.env.EXPO_PUBLIC_GOOGLE_WEB_CLIENT_ID,
},
// secondaryClientIds: [process.env.EXPO_PUBLIC_GOOGLE_OTHER_CLIENT_ID!],
},
apple: {
primaryClientId: {
// Services ID — used on Android for the web-based OAuth flow.
serviceId: process.env.EXPO_PUBLIC_APPLE_SERVICES_ID,
// iOS bundle ID — used as the audience for the native iOS Sign-In flow.
iosBundleId: process.env.EXPO_PUBLIC_APPLE_IOS_BUNDLE_ID,
},
},
facebook: {
primaryClientId: process.env.EXPO_PUBLIC_FACEBOOK_CLIENT_ID,
},
x: { primaryClientId: process.env.EXPO_PUBLIC_X_CLIENT_ID },
discord: { primaryClientId: process.env.EXPO_PUBLIC_DISCORD_CLIENT_ID },
},
},
};
```
By default, Turnkey hosts the OAuth redirect and origin pages at
`https://oauth-redirect.turnkey.com` and `https://oauth-origin.turnkey.com`,
which forward back into your app via the `appScheme` you configured. If
you'd rather host these yourself, you can set a `redirectUri` in the `TurnkeyProvider`'s config. Whatever URL you set must match the
one registered in the provider's developer dashboard.
Make sure your Expo `app.json` includes your deep link scheme:
```json app.json theme={"system"}
{
"expo": {
"scheme": "myapp"
}
}
```
## Usage
In your app, call the corresponding helper for each provider from `useTurnkey`: `handleGoogleOauth`, `handleAppleOauth`, `handleFacebookOauth`, `handleDiscordOauth`, and `handleXOauth`.
```tsx app/index.tsx expandable theme={"system"}
import { useState } from "react";
import { Alert, Button, View } from "react-native";
import { useRouter } from "expo-router";
import { useTurnkey } from "@turnkey/react-native-wallet-kit";
export default function SocialLoginButtons() {
const router = useRouter();
const {
handleGoogleOauth,
handleAppleOauth,
handleFacebookOauth,
handleDiscordOauth,
handleXOauth,
} = useTurnkey();
const [loading, setLoading] = useState(false);
const wrap = (fn: () => Promise) => async () => {
try {
setLoading(true);
await fn();
router.replace("/(main)");
} catch (err) {
Alert.alert("Error", String(err));
} finally {
setLoading(false);
}
};
return (
);
}
```
## Provider details
### Oauth providers
#### Google
Requirements:
* Client ID: use a Web client ID from the Google developer console and set it in the Dashboard or in the `TurnkeyProvider`'s config.
* In the **Google developer console**, set the authorized redirect URL to `https://oauth-redirect.turnkey.com/?scheme=YOURAPPSCHEME/` and the authorized JavaScript origin to `https://oauth-origin.turnkey.com/`. Replace `YOURAPPSCHEME` with the `appScheme` you set in `auth.oauth`.
Usage:
```tsx theme={"system"}
const { handleGoogleOauth } = useTurnkey();
await handleGoogleOauth();
```
#### Apple
`handleAppleOauth` uses the **native** Sign in with Apple flow on iOS devices. For this to work you must:
* Enable the **Sign in with Apple** capability for your iOS app in **Xcode** (Signing & Capabilities).
* Enable **Sign in with Apple** for the app identifier in the **Apple Developer** dashboard.
On Android, `handleAppleOauth` falls back to a **web-based** Apple OAuth flow that authenticates against the Apple **Services ID**. To keep iOS and Android sign-ins linked to the same Turnkey user, configure both `serviceId` and `iosBundleId` on `apple.primaryClientId`. The `iosBundleId` is automatically registered as a secondary client ID on the sub-org during Android signups (and vice-versa).
Requirements:
* Client IDs: Apple **Services ID** (Android web flow) and iOS **bundle ID** (native iOS flow), set in the `TurnkeyProvider`'s config.
* In the **Apple Developer** dashboard, set the Services ID's return URL to `https://oauth-redirect.turnkey.com/?scheme=YOURAPPSCHEME/` and its domain/origin to `https://oauth-origin.turnkey.com/`. Replace `YOURAPPSCHEME` with the `appScheme` you set in `auth.oauth`. This is only required for the Android web-based flow; the native iOS flow doesn't need it.
Usage:
```tsx theme={"system"}
const { handleAppleOauth } = useTurnkey();
await handleAppleOauth();
```
`handleAppleWebOauth` is also exposed but **deprecated**. It's kept for
backwards compatibility with older SDK versions and forces the web-based
Apple OAuth flow on all platforms (including iOS), using `serviceId` as the
audience. Only use it if you specifically need to force the web flow on iOS.
#### Facebook
Requirements:
* Client ID: set in Dashboard or in the `TurnkeyProvider`'s config.
* In the **Facebook for Developers** dashboard, set the valid OAuth redirect URI to `https://oauth-redirect.turnkey.com/?scheme=YOURAPPSCHEME/` and the app domain to `https://oauth-origin.turnkey.com/`. Replace `YOURAPPSCHEME` with the `appScheme` you set in `auth.oauth`.
Usage:
```tsx theme={"system"}
const { handleFacebookOauth } = useTurnkey();
await handleFacebookOauth();
```
### OAuth2.0 providers
For OAuth providers that exclusively use OAuth2.0 (e.g., X, Discord), you will need to configure a few additional settings in your Turnkey Dashboard.
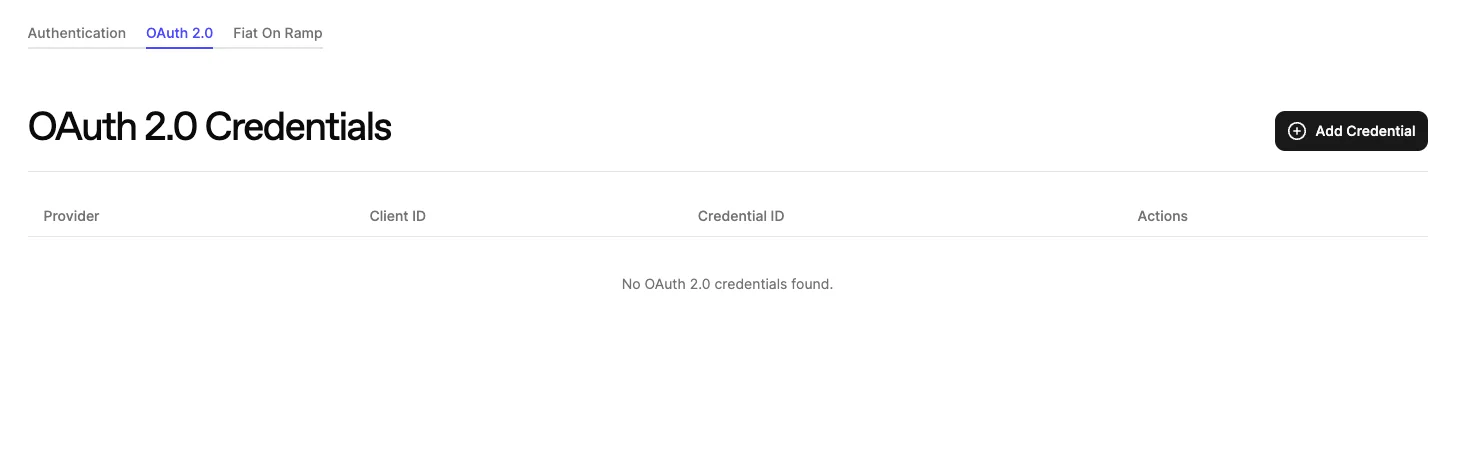
In the **Embedded Wallets → Configuration** section of the dashboard, head to the **OAuth 2.0** tab and click **Add Credential**.
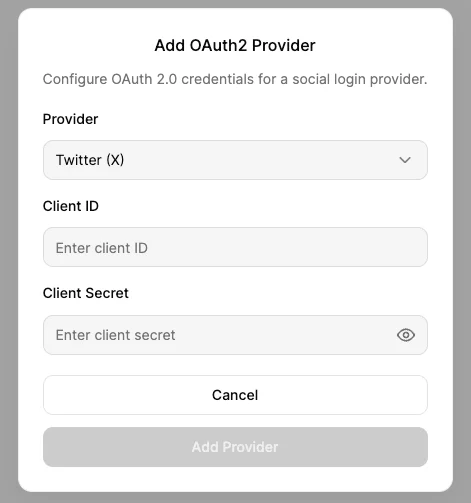
Select the provider you want to add from the dropdown, and fill in the required fields.
You can find these values in the provider's developer console.
Any secrets will automatically be encrypted before uploading to Turnkey.
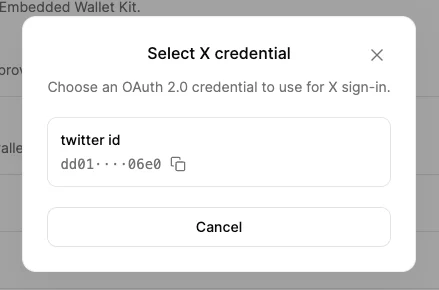
Once you've added the provider, head back to the **Authentication** tab, and enable the provider you just added under the **SDK Configuration** section.
Click **Select** to choose your newly added client ID, then click **Save Settings**. You can also simply enter the client ID in the `TurnkeyProvider`'s config as shown above.
#### Discord
Requirements:
* Client ID: set in Dashboard or in the `TurnkeyProvider`'s config.
* In the **Discord Developer Portal**, set the redirect URI to `YOUR_APP_SCHEME://`.
Usage:
```tsx theme={"system"}
const { handleDiscordOauth } = useTurnkey();
await handleDiscordOauth();
```
#### X (Twitter)
Requirements:
* Client ID: set in Dashboard or in the `TurnkeyProvider`'s config.
* In the **Twitter Developer Portal**, set the redirect URI to `YOUR_APP_SCHEME://`.
Usage:
```tsx theme={"system"}
const { handleXOauth } = useTurnkey();
await handleXOauth();
```
 #### Client IDs
You can choose to enter your primary client IDs for each OAuth provider in the dashboard
#### Client IDs
You can choose to enter your primary client IDs for each OAuth provider in the dashboard
 Or provide client IDs through your app configuration and pass them into the `TurnkeyProvider`'s config.
Client IDs typically come from the OAuth provider's developer console. For example, Google client IDs can be found in the [Google developer console](https://console.developers.google.com/).
Or provide client IDs through your app configuration and pass them into the `TurnkeyProvider`'s config.
Client IDs typically come from the OAuth provider's developer console. For example, Google client IDs can be found in the [Google developer console](https://console.developers.google.com/).
 Select the provider you want to add from the dropdown, and fill in the required fields.
You can find these values in the provider's developer console.
Any secrets will automatically be encrypted before uploading to Turnkey.
Select the provider you want to add from the dropdown, and fill in the required fields.
You can find these values in the provider's developer console.
Any secrets will automatically be encrypted before uploading to Turnkey.
 Once you've added the provider, head back to the **Authentication** tab, and enable the provider you just added under the **SDK Configuration** section.
Click **Select** to choose your newly added client ID, then click **Save Settings**. You can also simply enter the client ID in the `TurnkeyProvider`'s config as shown above.
Once you've added the provider, head back to the **Authentication** tab, and enable the provider you just added under the **SDK Configuration** section.
Click **Select** to choose your newly added client ID, then click **Save Settings**. You can also simply enter the client ID in the `TurnkeyProvider`'s config as shown above.
 #### Discord
Requirements:
* Client ID: set in Dashboard or in the `TurnkeyProvider`'s config.
* In the **Discord Developer Portal**, set the redirect URI to `YOUR_APP_SCHEME://`.
Usage:
```tsx theme={"system"}
const { handleDiscordOauth } = useTurnkey();
await handleDiscordOauth();
```
#### X (Twitter)
Requirements:
* Client ID: set in Dashboard or in the `TurnkeyProvider`'s config.
* In the **Twitter Developer Portal**, set the redirect URI to `YOUR_APP_SCHEME://`.
Usage:
```tsx theme={"system"}
const { handleXOauth } = useTurnkey();
await handleXOauth();
```
#### Discord
Requirements:
* Client ID: set in Dashboard or in the `TurnkeyProvider`'s config.
* In the **Discord Developer Portal**, set the redirect URI to `YOUR_APP_SCHEME://`.
Usage:
```tsx theme={"system"}
const { handleDiscordOauth } = useTurnkey();
await handleDiscordOauth();
```
#### X (Twitter)
Requirements:
* Client ID: set in Dashboard or in the `TurnkeyProvider`'s config.
* In the **Twitter Developer Portal**, set the redirect URI to `YOUR_APP_SCHEME://`.
Usage:
```tsx theme={"system"}
const { handleXOauth } = useTurnkey();
await handleXOauth();
```