> ## Documentation Index
> Fetch the complete documentation index at: https://docs.turnkey.com/llms.txt
> Use this file to discover all available pages before exploring further.
# Integration guide
> An SDK-agnostic introduction to integrating Turnkey embedded wallets: how to choose your SDK, how integrations are structured, and when to use the Auth Proxy.
You've seen what Turnkey's embedded wallets can do. This page covers the concepts and architectural
decisions that apply across all platforms before you dive into the platform-specific guides.
## Choose your SDK
Turnkey provides SDKs at different levels of abstraction. The right choice depends on your platform
and how much you want pre-built for you.
Pre-built UI components, hook-based API, and no backend required. Recommended for React and
Next.js apps.
The mobile counterpart to the React wallet kit, optimized for mobile-native flows.
The underlying TypeScript SDK. Best for Angular, Vue, Svelte, or any web framework where the
React Wallet Kit doesn't apply.
Dart SDK — Cross-platform iOS and Android support.
Swift SDK — Native iOS integration.
Kotlin SDK — Native Android integration.
Call the Turnkey REST API directly from any language.
## How integrations are structured
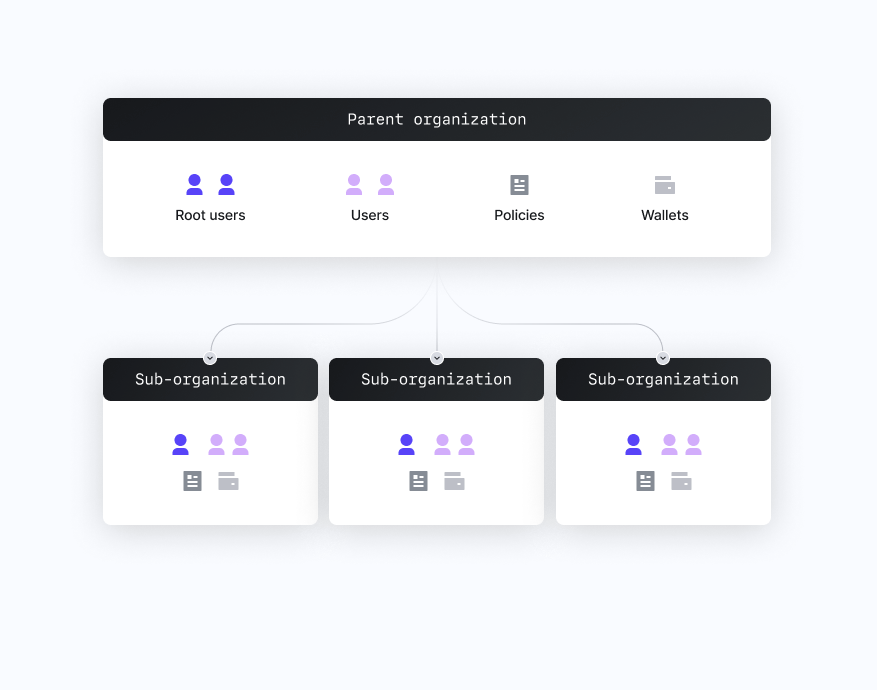
Every Turnkey embedded wallet integration is built around the same model: **one sub-organization per
user.**
Your account is the **parent organization**. Each end user gets their own **sub-organization** — a
fully isolated environment with its own wallets, credentials, and policies. Isolation is strict:
credentials in one sub-org cannot authorize actions in another.
 See [Embedded Wallets Overview](/solutions/embedded-wallets/overview#custody-models) for a breakdown of
custodial models based on this architecture.
## The Auth Proxy
Creating a sub-organization and initiating email/SMS OTP flows require a request stamped by your
root organization's API key. Traditionally this means hosting a backend.
The **Auth Proxy** is Turnkey's managed backend for these operations. Enable it in the dashboard,
configure your allowed origins and auth methods, and your frontend can call
`https://authproxy.turnkey.com` directly — no server needed on your end.
See [Embedded Wallets Overview](/solutions/embedded-wallets/overview#custody-models) for a breakdown of
custodial models based on this architecture.
## The Auth Proxy
Creating a sub-organization and initiating email/SMS OTP flows require a request stamped by your
root organization's API key. Traditionally this means hosting a backend.
The **Auth Proxy** is Turnkey's managed backend for these operations. Enable it in the dashboard,
configure your allowed origins and auth methods, and your frontend can call
`https://authproxy.turnkey.com` directly — no server needed on your end.
- You want to ship without standing up a backend
- You're using the React or React Native Wallet Kit (they're designed around it)
- Your auth flows are OTP, OAuth, and new-user signup
- You already run a backend and want to keep signing logic there
- You need flows the Auth Proxy doesn't cover
- You need full control over request construction and error handling
The React Wallet Kit's `TurnkeyProvider` accepts an `authProxyConfigId` and handles all
proxy-bound requests automatically. You only need your Organization ID and Proxy Config ID from
the dashboard.
See [Auth Proxy reference](/features/authentication/auth-proxy) for endpoint documentation and configuration
options.
## How request signing works
Every write to Turnkey — creating a wallet, signing a transaction, updating a policy — is an
**activity**. Activities must be **stamped** (cryptographically signed) by an authorized credential
before the enclave will execute them.
The typical flow for a user-initiated action:
The user completes an auth flow (passkey prompt, OTP code, OAuth). The SDK stores a session
credential — a short-lived signing key — in the device's secure storage.
When your app calls an SDK method (e.g., `createWallet`, `signTransaction`), the SDK constructs
the activity payload and signs it with the session credential.
The enclave verifies the stamp, checks it against the sub-org's policies, and executes the
operation. For signing operations, only the signature is returned — private keys never leave the
enclave.
For operations that require your root org's authorization (like creating a new sub-org), the stamp
comes from the Auth Proxy or your own backend, not the user's session credential.
## Sessions
Sessions control how long a user stays authenticated without re-prompting. The SDK stores the
session credential in device-native secure storage (IndexedDB in browsers, SecureStorage on mobile)
and renews it automatically when possible.
Default session length is 15 minutes, configurable per flow. If a session expires, the SDK surfaces
an unauthenticated state and your app prompts re-auth.
See [Sessions](/features/authentication/sessions) for configuration options.
## What the platform guides cover
Each platform guide walks through the full integration lifecycle:
* Installing and configuring the SDK
* Auth flows: passkeys, email/SMS OTP, and OAuth (Google, Apple, etc.)
* Creating wallets and deriving addresses
* Signing transactions
* Advanced topics: custom sub-org configuration, backend-authenticated flows, import/export
Select your platform from the sidebar to begin.